

Showing posts with label Candy Corn. Show all posts
Showing posts with label Candy Corn. Show all posts
Thursday, October 24, 2019
Reclaimed Wood Candy Corn Sign
We have a bunch of old fence panels and I am having fun finding ways to use them for different signs. I was pretty pleased with how this Candy Corn Sign ended up:


Wednesday, October 28, 2015
Candy Corn Cupcakes
Last weekend my church had their annual trunk-or-treat and I was in a hurry to come up with a festive dessert to take. When I found Candy Corn Cupcakes, I knew I had to make them...because who doesn't love candy corn?!

They were so easy to make and they turned out so cute! All you have to do is:

They were so easy to make and they turned out so cute! All you have to do is:
Tuesday, October 8, 2013
Candy Corn Earrings from a Paperclip
I’ve been meaning to make a candy corn version of my heart earrings for…over a year (ahem)…and finally got it done! 

Monday, October 4, 2010
Candy Corn Sugar Cookies
When I made these cookies, all my husband would say is that I'm obsessed. Who can blame me? These turned out pretty darn cute if I do say so myself!

It is really easy to make these and they are such a fun variation of traditional sugar cookies. They're so cute you don't have to ice them...or you could in a continued candy corn theme.
Mix up a batch of sugar cookies. Separate your dough into 3 bowls. One bowl with about half of your dough. With the other half, take about a third and put that into another bowl, and the rest into your last bowl.
Using food coloring, make your largest bowl of dough yellow, the second largest orange, and leave the smallest bowl white. Mix, mush and smash until you have a uniform color.

Divide each of your colors in half. Take one half of your yellow dough and roll it into a snake. Flatten the top and bottom of it and lay it on wax paper.
Roll half of your orange into a snake the same length as your yellow, flatten the top and bottom a bit and lay that on top of your yellow snake.

Do the same with half of your white dough, but shape into a triangle and lay on top of your orange.
 I had a request to explain the white layer better...hopefully this makes more sense... The above picture is just to show the general shape of your candy corn log (the log is lying on it's side, already chilled). Roll half of your white dough into a log the same length as your orange/yellow log and flatten the sides into a triangle. Put that on top of the orange layer.
Wrap up your tricolored snake with the wax paper and run your hands along the sides to flatten/smooth it out until your snake is more of a long triangle.

Do the same with your other half and allow to chill in the fridge for 2 hours.
Unwrap your logs and either using floss by wrapping it around the log and pulling it across each other, or a knife, cut your dough into 1/4 inch wide slices.
Lay on your cookie sheet and cook for 8-12 minutes.

Wish like crazy you had a window in your oven...pull out and allow to cool on the sheet for 1 minute.

Remove to a cooling rack and devour as soon as they are cool enough to handle. Enjoy!
 I absolutely love C's new cheese smile :)
I'm linking up to Made By You Monday @ Skip to My Lou, Making the World Cuter Monday @ Making the World Cuter, Creative Share Blog Hop @ Trendy Treehouse, Motivate Me Monday @ Keeping it Simple, Mad Skills Monday @ Super Stinky Boys, It's So Very Creative Monday @ It's So Very Creative, and the DIY Project Parade @ The DIY Showoff, Tasty Tuesday @ Beauty and Bedlam, Tempt My Tummy Tuesday @ Blessed with Grace.

It is really easy to make these and they are such a fun variation of traditional sugar cookies. They're so cute you don't have to ice them...or you could in a continued candy corn theme.
Mix up a batch of sugar cookies. Separate your dough into 3 bowls. One bowl with about half of your dough. With the other half, take about a third and put that into another bowl, and the rest into your last bowl.
Using food coloring, make your largest bowl of dough yellow, the second largest orange, and leave the smallest bowl white. Mix, mush and smash until you have a uniform color.

Divide each of your colors in half. Take one half of your yellow dough and roll it into a snake. Flatten the top and bottom of it and lay it on wax paper.
Roll half of your orange into a snake the same length as your yellow, flatten the top and bottom a bit and lay that on top of your yellow snake.

Do the same with half of your white dough, but shape into a triangle and lay on top of your orange.

Wrap up your tricolored snake with the wax paper and run your hands along the sides to flatten/smooth it out until your snake is more of a long triangle.

Do the same with your other half and allow to chill in the fridge for 2 hours.
Unwrap your logs and either using floss by wrapping it around the log and pulling it across each other, or a knife, cut your dough into 1/4 inch wide slices.

Lay on your cookie sheet and cook for 8-12 minutes.

Wish like crazy you had a window in your oven...pull out and allow to cool on the sheet for 1 minute.

Remove to a cooling rack and devour as soon as they are cool enough to handle. Enjoy!
 I absolutely love C's new cheese smile :)
I'm linking up to Made By You Monday @ Skip to My Lou, Making the World Cuter Monday @ Making the World Cuter, Creative Share Blog Hop @ Trendy Treehouse, Motivate Me Monday @ Keeping it Simple, Mad Skills Monday @ Super Stinky Boys, It's So Very Creative Monday @ It's So Very Creative, and the DIY Project Parade @ The DIY Showoff, Tasty Tuesday @ Beauty and Bedlam, Tempt My Tummy Tuesday @ Blessed with Grace.
Thursday, September 23, 2010
Candy Corn Pinecones
So, I might be slightly obsessed with candy corn...or so says my husband. I may or may not have eaten most of a bag of candy corn already and put myself on strict regulations to not buy anymore for at least 2 weeks, but that's beside the point.
K has been collecting pinecones as they fall off the tree out front all summer long and they have sat in a little pile near our front door. I've thought about making a wreath with them or something else, but as soon as my mind started thinking "candy corn, candy corn, candy corn" nothing else would do. All you do is wash them (at least if they've been sitting in a pile in the dirt for months) and let them dry. The longer you leave them to dry, the more open they become...maybe everyone except me knew that already before this summer.
Slap a little orange paint in the middle of the pinecone... add some yellow on the bottom
and some white on top and voila! Festive, fallish pinecones that make the perfect decor! It's like covering a whole season doubly much :)


Wouldn't the world be so much more fun if this was what you found on the grass? :)
I'm linking up to Crazy Cute Thursdays @ Between U & Me, Strut-Your-Stuff Thursday @ Somewhat Simple, Hookin' Up with HoH @ House of Hepworths, and Show Off Your Stuff @ Fireflies and Jellybeans,
K has been collecting pinecones as they fall off the tree out front all summer long and they have sat in a little pile near our front door. I've thought about making a wreath with them or something else, but as soon as my mind started thinking "candy corn, candy corn, candy corn" nothing else would do.
 All you do is wash them (at least if they've been sitting in a pile in the dirt for months) and let them dry. The longer you leave them to dry, the more open they become...maybe everyone except me knew that already before this summer.
Slap a little orange paint in the middle of the pinecone...
 add some yellow on the bottom
and some white on top
 and voila! Festive, fallish pinecones that make the perfect decor! It's like covering a whole season doubly much :)

Wouldn't the world be so much more fun if this was what you found on the grass? :)
I'm linking up to Crazy Cute Thursdays @ Between U & Me, Strut-Your-Stuff Thursday @ Somewhat Simple, Hookin' Up with HoH @ House of Hepworths, and Show Off Your Stuff @ Fireflies and Jellybeans,
Friday, September 17, 2010
Candy Corn Door Hanging
Oh candy corn...that sweet, addicting candy that by the wisdom of anyone who sells it is only available for a brief time each year. Trust me...my hips thank them, though I think about candy corn sporadically throughout the year.
Now, with these wonderfully plush candy corn door hangings, I can enjoy them (at least visually) throughout the year. If I take them off the ribbon, my boys can squish and hug and love candy corn whenever they darn well please...without the cavities :) This is another project that is wonderful for using up scraps of fabric if you have a million of every color. Make them more exciting by using prints on some of your colors.
Print off the template below or draw one of your own. Each of the layers will not line up perfectly if you lay them next to each because there is additional allowance for the smaller layers to compensate for the seam allowances.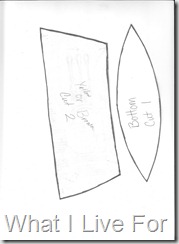

Cut out two of each layer, and one of the bottom. From here on out I will refer to each layer by the number given them in the picture below. Yes, I know the tutorial is of Indian Corn, but it's almost as good, right? :)
Line up the bottom of piece number 1 with the top of piece number 2 with right sides facing each other, like below. Sew them together along that line.
Line up the bottom of number 2 with the top of number 3 with right sides facing together, like you just did. Sew those together.
Press your seams nice and flat.
Repeat with the other side.
Lay your two sides together, right sides facing each other and sew together except for the bottom. I found it easiest to start from the tip and work my way down, then go back up again for the other side.
With your candy corn still inside out, sew the bottom piece to the bottom of your candy corn, pivoting at each of the corners. Be sure to leave a wide enough gap for turning it right side out.
Turn right side out And stuff!
Hand sew the opening closed
 and enjoy the plush goodness of candy corn :)
If you want to make a door hanging, you can use thread and just thread it through the top of your candy corn. I had a large needle that allowed me to thread ribbon through. I tied knots below each of them to hold them in place and hung it proudly on my door, much to the dismay of my boys who thought I was making them toys to play with. You could also resize the pattern and make a variety of sizes.
You could hang them in bunches, or just let them set on a table as a centerpiece.
For more Halloween/fall fun, check out my Jack-O-Lanterns from a Jar!
Thank you Sew Totally Smitten for the inspiration!
I'm linking up to: Weekend Wrap Up Party @ Tatertots and Jello, Feature Yourself Friday @ Fingerprints on the Fridge, Friday Fun Finds @ KojoDesigns, Fabulous Finds Friday @ 6 Inches of Ribbon, Categorically Crafting @ Someday Crafts, and Look At Me @ It's Fun to Craft!
Now, with these wonderfully plush candy corn door hangings, I can enjoy them (at least visually) throughout the year. If I take them off the ribbon, my boys can squish and hug and love candy corn whenever they darn well please...without the cavities :)
 This is another project that is wonderful for using up scraps of fabric if you have a million of every color. Make them more exciting by using prints on some of your colors.
 Print off the template below or draw one of your own. Each of the layers will not line up perfectly if you lay them next to each because there is additional allowance for the smaller layers to compensate for the seam allowances.


Cut out two of each layer, and one of the bottom. From here on out I will refer to each layer by the number given them in the picture below. Yes, I know the tutorial is of Indian Corn, but it's almost as good, right? :)

Line up the bottom of piece number 1 with the top of piece number 2 with right sides facing each other, like below. Sew them together along that line.

Line up the bottom of number 2 with the top of number 3 with right sides facing together, like you just did. Sew those together.
Press your seams nice and flat.
Repeat with the other side.

Lay your two sides together, right sides facing each other and sew together except for the bottom. I found it easiest to start from the tip and work my way down, then go back up again for the other side.

With your candy corn still inside out, sew the bottom piece to the bottom of your candy corn, pivoting at each of the corners. Be sure to leave a wide enough gap for turning it right side out.

Turn right side out
 And stuff!
 Hand sew the opening closed
 and enjoy the plush goodness of candy corn :)
If you want to make a door hanging, you can use thread and just thread it through the top of your candy corn. I had a large needle that allowed me to thread ribbon through. I tied knots below each of them to hold them in place and hung it proudly on my door, much to the dismay of my boys who thought I was making them toys to play with. You could also resize the pattern and make a variety of sizes.

You could hang them in bunches, or just let them set on a table as a centerpiece.

For more Halloween/fall fun, check out my Jack-O-Lanterns from a Jar!
Thank you Sew Totally Smitten for the inspiration!
I'm linking up to: Weekend Wrap Up Party @ Tatertots and Jello, Feature Yourself Friday @ Fingerprints on the Fridge, Friday Fun Finds @ KojoDesigns, Fabulous Finds Friday @ 6 Inches of Ribbon, Categorically Crafting @ Someday Crafts, and Look At Me @ It's Fun to Craft!
Subscribe to:
Posts (Atom)